
Install FreeRADIUS
Copy the FreeRADIUS package to your local Linux system. The package should consists of the following components:
-
FreeRADIUS package
-
FreeRADIUSv3.sh (Agent Deployment Shell Script)
-
Client_Updater.sh (Manual RADIUS Client Updater Script)
-
Startup.sh (Startup Shell Script)
-
-
Image tar File
-
FreeRADIUS Image: Load the image into your local system using the following command:
docker load –i <image name>.tarEnsure that all the scripts are in executable mode for the user running the shell scripts. To confirm, execute the following command:
chmod +x ./<name of shell script>
-
Install the Solution
Execute the FreeRADIUSv3.sh shell script from the package by running the command where the shell script is present: ./FreeRADIUSv3.sh
To upgrade, execute the FreeRADIUSv3.sh shell script. The script will handle all upgrade scenarios, automatically.
The following steps detail the flow for component check, and prompt for inputs as necessary before completing the agent installation:
-
The first component, the script checks for, is if the Docker is installed. If the Docker is present, the following message is displayed:
Docker setup is a prerequisite for this installation. Checking...

Found Docker. Continuing...
If the Docker is not installed, follow the steps to install Docker.
-
The script then checks if any of the following two FreeRADIUS components are present:
-
FreeRADIUS Agent
-
FreeRADIUS Updater
It also checks, if there is a FreeRADIUS container already present. If all three components are present, visit the Upgrade section.
FreeRADIUS Agent for RADIUS Server 2.x not found. Continuing...
FreeRADIUS Updater for RADIUS Server 2.x not found. Continuing...
Docker container for RADIUS Server 3.x not found. Continuing...
The above steps check for prerequisites. The following steps confirm details from the user, and help in the agent’s installation.
Press ENTER to continue.
-
-
If the default protocol for creating a container (by using the HTTP protocol) needs to be changed, type Y and press ENTER. If no change is required, type N and press ENTER.
The default protocol is HTTP. Change to HTTPS (recommended)? Y/N
If using SafeNet Trusted Access (STA) ensure that Y is entered.
Y
The default protocol must be changed for SafeNet Trusted Access (STA), since STA only supports HTTPS protocol.
-
Enter SafeNet Server IP or FQDN, and press ENTER.
-
Please provide the input as mentioned below.
-
For SAS PCE/SPE, please enter primary FQDN or Server IP.
-
For SafeNet Trusted Access (STA), please enter primary FQDN. Server IP is not permitted.
Please enter the Fully Qualified Domain Name (FQDN) of the authentication service (SAS/STA).
NOTE: If using SafeNet Authentication Service (SAS-PCE) IP address is optionally permitted.
xxxxxxxxx
-
-
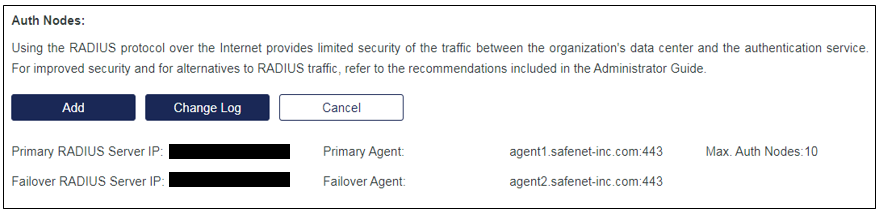
For STA, enter the FQDN of PrimaryAgent depending on your service zone. To locate the details, navigate to your STA Token Management console > COMMS > Auth Nodes.
The script validates if the SafeNet server Token Validator is accessible.
Making sure the authentication endpoint is accessible...
The authentication endpoint is accessible.
While providing the FQDN or hostname, ensure that the FQDN or hostname is accessible from RADIUS server machine. The hostname entry of the SafeNet server is provided under /etc/hosts file.
The user input needs to be in lowercase letters.
-
-
Check if the RADIUS Client API is accessible or not. The RADIUS Client API is responsible for updating RADIUS Client configurations from the SafeNet server to the FreeRADIUS server. This is applicable to SAS PCE/SPE only.
-
For SAS PCE/SPE, the RADIUS Client API is accessible. Press Y and press ENTER.
Is the SAS RADIUS Client API URL accessible? Y/N If using SafeNet Trusted Access (STA) ensure that N is entered. Y-
The script validates if the RADIUS Client API is accessible.
Making sure the SAS RADIUS Client API URL is accessible... The SAS RADIUS Client API URL is accessible. -
Enter the complete path, including the file name, of the JWT key file. The JWT authentication token file can be downloaded from the SafeNet server. To download the key from the SafeNet server, follow the steps at the Download JWT Key File section.
Please enter the complete path of JWT key file.
/etc/docker/FreeRadiusAgent/keys/jwtAuthToken.key

Making sure the agent BSID key file exists at the provided path...
The script validates if the JWT key file is available at the given path, and displays an appropriate message. The file is copied at the following location:
/usr/local/FreeRADIUS/Files/jwtAuthToken.keyThe copied file is mounted on FreeRADIUS Container.
-
-
For STA Cloud, the RADIUS Client API is not accessible. Press N and press ENTER.
Is the SAS RADIUS Client API URL accessible? Y/N
If using SafeNet Trusted Access (STA) ensure that N is entered.
N
-
-
Enter the complete path, including the file name, of the Agent BSID key file.
The key file can be downloaded from the SafeNet server, and is used to encrypt/decrypt the authentication string with the server. To download the key from the SafeNet server, follow the steps explained under Downloading BSID Key File section.
Please enter the complete path of the agent BSID key file (Agent.bsidkey).
/etc/docker/FreeRadiusAgent/keys/Agent.bsidkey

Making sure the agent BSID key file exists at the provided path...
The script validates if the Agent BSID key file is available at the given path, and displays an appropriate message. The file is copied at the following location:
usr/local/FreeRADIUS/Files/Agent.bsidkeyThe copied file is used to mount onto the FreeRADIUS Container.
-
If you wish to use FreeRADIUS Agent support for on-prem password validation, enable concatenated credentials whereby an LDAP Password and an OTP is sent in a single password field. To use credential concatenation, enter Y as input and go to step 7.a.
Please ensure that you type N if you want to use the default behavior, where only OTP validation works and move to point 8.
Do you want to enable validation of concatenated LDAP Password+OTP as a single field? Y/N N-
To configure the Agent with credential concatenation, please ensure to Type Y at step 7, and provide the LDAP details as mentioned below. After completing these inputs, go to point 8 to continue configuration.
-
Enter the LDAP Server IP or Hostname.
Enter LDAP Server IP or Hostname 10.0.1.25 -
Enter the LDAP port which is configured with your LDAP Server.
Enter LDAP Port to connect on. Example : 389 389 -
Enter the LDAP service account Details.
Enter LDAP Identity Common Name. Example :cn=Administrator,cn=Users cn=Administrator,cn=Userssers -
Enter the LDAP service account Password.
Enter LDAP Administrator Password -
Enter the Base DN of your LDAP Server.
Enter LDAP Domain Controller Base DN. Example:dc=example,dc=com dc=testdomain,dc=com -
Enter the delimiter to split the password for authentication.
Enter the Delimiter which will be used to split the LDAP AD password and OTP while authenticating
NOTE: Delimiters like ‘%’, ‘(’Left Bracket, ‘.’, ‘?’, and ‘*’ will not work with the Agent. Please use any other Delimiter
,
Make sure the LDAP Server details are entered correctly. The FreeRADIUS container may crash if the details provided are not correct.
With complex LDAP password and OTP it is recommended to use string as a delimiter to avoid issues with user passwords having the same character in delimiter
-
-
-
To determine FreeRADIUS agent response in case of the authentication service being unavailable, Please provide Y as input to fail silently, else go with N as your input (returns access-reject).
Do you want the service to be silent (do_not_respond) when SAS/STA is unavailable? Y/N
NOTE: Not responding may help customer controlled failover.

Y
Setting Value Accordingly
For Input as N
Do you want the service to be silent (do_not_respond) when SAS/STA is unavailable? Y/N
NOTE: Not responding may help customer controlled failover.

N
By default the FreeRADIUS agent would respond as an Access-Reject in case the SafeNet server is not reachable, if Y is provided as an input then the RADIUS Client would respond as No response from the server this will help to control failover.
-
This step is Optional. For PEAP support with a strong EAP type, such as TLS with certificates, both the client and the server use certificates to verify their identities to each other. Certificates must meet specific requirements, both on the server and on the client machine for successful authentication.
By default, the FreeRADIUS image contains these certificates at the following path:
/opt/gemalto/certs-
For using default certificates, press Y and press ENTER.
Do you wish to use default certificates for PEAP support? Y/N Y -
For using proprietary/own certificates, press N and press ENTER.
Do you wish to use default certificates for PEAP support? Y/N N-
Certificate Authority Certificate is the first required certificate. Enter the path of the certificate.
Enter complete path of the Certificate Authority certificate.

/etc/docker/certsFRv3/cacert.pem
The script will validate if the certificate is present at the provided path. The Certificate Authority Certificate will then be copied to the following location, usr/local/FreeRADIUS/Certs and renamed as ca.pem.
-
Key Certificate is the second required certificate. Enter the path of the certificate.
Enter complete path of the Key Certificate. /etc/docker/certsFRv3/keycert.pem-
The script will validate if the certificate is present at the provided path. The Key Certificate will then be copied to the following location: usr/local/FreeRADIUS/Certs and renamed as ca.pem.
-
The script will then prompt the user to enter passphrase if the Key Certificate is passphrase protected. If the certificate is not passphrase protected, press ENTER to continue.
Enter Passphrase for Key Certificate. If no Passphrase exists Press [Enter] to continue.
-
-
Client Certificate is the third required certificate. Enter the path of the certificate.
Enter complete path of the Client Certificate.
/etc/docker/certsFRv3/servercert.pem
The script will validate if the certificate is present at the provided path. The Client Certificate will then be copied to the following location, usr/local/FreeRADIUS/Certs and renamed as server.pem.
-
-
-
Enter external port number of the FreeRADIUS container.
Please enter the Port Number FreeRadius will listen to (1812).
1812

The Port is accessible.
The script validates if the port is accessible or not, and displays an appropriate message. If the port is not accessible, the script does not exit.
-
Select whether you want to use the default Encoding Format iso8859 or utf8. This configuration option will determine how to interpret username/password. By default the agent supports iso-8859-1 encoding which means that there is no support for non-European languages.
-
To select the default option of iso8859. Type N, and press ENTER.
-
To change the option to utf8. Type Y, and press ENTER.
By default the FreeRADIUS agent is configured for ISO-8859-1 encoding. Change to UTF8? Y/N
NOTE: Changing to UTF8 may help support national characters such as å,ä,ö (but these MUST be supported in the full architecture).

N
-
-
Select whether you want to use SYSLOG or a JSON-FILE as the default log driver for the FreeRADIUS container. By default, the script will deploy SYSLOG as the default log driver.
By default the log driver for the FreeRADIUS container is set to 'SYSLOG'. Change to JSON-FILE? Y/N-
To select SYSLOG as the default log driver: Type N and press ENTER.
By default the log driver for the FreeRADIUS container is set to 'SYSLOG'. Change to JSON-FILE? Y/N N-
To select local host as SYSLOG Server: Type N, and press ENTER.
Do you want to use an external Syslog server? Y/N N Checking if syslog daemon is running on host machine.. Redirecting to /bin/systemctl status rsyslog.service Syslog daemon is running on host machine -
To select external host as a SYSLOG Server: Type Y, and press ENTER.
Do you want to use an external Syslog server? Y/N
Y

Provide the Syslog server address in this format: <Protocol>://<Syslog_Server_IP>:<Port>, example: udp://127.0.0.1:514"

Checking if syslog daemon is running on host machine..

Redirecting to /bin/systemctl status  rsyslog.service
Syslog daemon is running on host machine
Note
- Enter SYSLOG Server address in the following format:
<Protocol>://<SYSLOG_Server_IP>:<Port>
For example,udp://127.0.0.1:514 udp://10.164.45.44:514 - SYSLOG log drivers are saved under: /var/log/messages
- The FreeRADIUS Container logs can be distinguished from system logs. The former will have the FreeRADIUS tag before them.
- Enter SYSLOG Server address in the following format:
-
-
To select a JSON-FILE as the default log driver: Type Y, and press ENTER. Configure the JSON file as below:
-
To set JSON-FILE as the log driver and create the FreeRADIUS container, the container values need to be set. If you type N (and press ENTER), the script, by default, creates a container with max-size=50m and maxfile=5 values. If you want to change these values, type Y, and press ENTER.
Setting log driver to 'JSON-FILE' with default values: max-size=50m and maxfile=5. Do you want to change these values? Y/N Y -
The script will prompt for the values required for max-size and maxfile fields, and creates the container with the supplied values.
Enter value for maz-size (followed by ‘m’, ‘k’, or ‘g’).
1000k
Enter value for max-file
7
Note
-
max-size field: Maximum log size before it is rolled.
-
Accepted Values: Positive integer followed by the unit of measure
(k for kilobytes, m for megabytes or g for gigabytes). -
maxfile field: Maximum number of log files that can exist in a container. This field is effective only when the max-size field is set. If rolling the logs create excess files, the oldest file is removed.
Accepted Values: Positive integer.
The Json file logs can be located by executing the following command:
docker logs –f FreeRADIUSv3
-
-
-
Using the given values, the script creates a FreeRADIUS container.
-
The script validates if the container starts, using the provided inputs.
Making sure the FreeRADIUS Container has been deployed successfully... FreeRadius container FreeRADIUSv3 has been deployed successfully. -
The FreeRADIUS container is ready to use.
FreeRADIUS container 'FreeRADIUSv3' is ready to process requests.- In case of fresh installations, no uninstallations are required. In case of upgrades, old installations need to be uninstalled
- To ensure uninterrupted access to the FreeRADIUS Container (after installation), execute the Startup Script.
- In case of fresh installations, no uninstallations are required. In case of upgrades, old installations need to be uninstalled
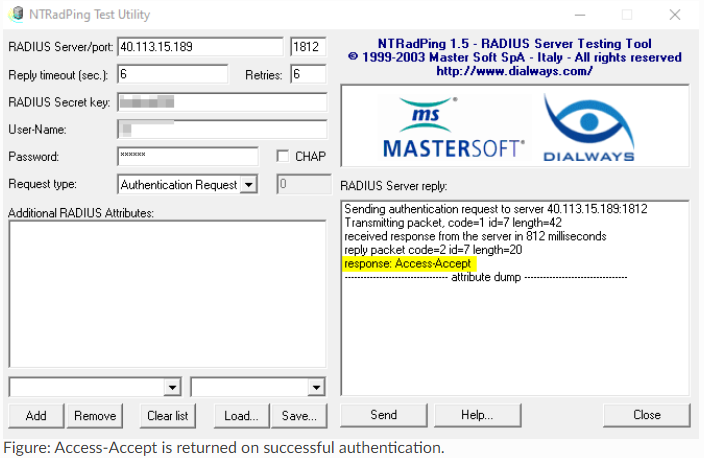
Test Authentication
The passcode required for Authentication will be LDAP password followed by OTP code (split by delimiter). For example, if you are using NTRadping, then the password will be concatenation of LDAP password followed by delimiter followed by OTP code.
JSON and SYSLOG Drivers
JSON Logging Driver
JSON logging driver allows to capture the standard output (and standard error) in JSON format, in files which annotate each line with its origin (stdout or stderr) and timestamp.
SYSLOG Logging Driver
SYSLOG logging driver allows you to route logs to a SYSLOG server. The SYSLOG message must be formatted in a specific way, to enable valid extraction of the information.